


I wasn't going to post today as I have been so ill and in bed most of the day. However I couldn't not quickly post about my nails which turned out better than I could of hoped!
The idea for this popped into my head a few days ago from nowhere... I have never seen anything similar (though I am sure someone else has though of the same thing) so I decided to go for something a bit summery. But really the colour combinations for this are endless!
I am dying to try this effect with white and two types of blue nail polish so they look like bubblegum ice-cream nails! I think that would look really cool.

As this is fairly easy to do I promise to write-up a tutorial on these next week showing a different colour combination as well!
For the base I used Models Own Concrete Mixer and then for the swirly effect I used Models Own Pink Punch and Deborah Lippman Razzle Dazzle.
Really excited about these as they just look so interesting and slightly galaxy nails-esque!
Fee xo.

I'm very nearly at the end of my 30 Day of Nails challenge (all NOTD here) so I thought for the last few days I would try some new things out!
For today's nails I decided to buy some gold Striping Tape from eBay as I have seen many nail bloggers use this for french manicures and other different things. So I thought I would give it a go!
Sadly I failed to realise how long this would take me to do and I should of just opted for a spring slant on the classic french manicure (I think this would actually be really great to conceal wonky lines if you aren't go good at french tips). But once I had started I was determined to finish all 10 nails which did actually take me over an hour!

However I am still SO glad that I bought the striping nail art tape as I know I can use it for all sorts of nail related things. I actually bought the silver and gold striping tape as a set from an eBay seller for only 99p plus free delivery! You can find the listing here. Like most nail art supplies on eBay the item was from Hong Kong so I was expecting it to wait awhile for it to arrive but surprisingly delivery took only 10 days!
The tape is very easy to use with it having a sticky backing so you can cut it and just stick it directly onto the nails if you wish. However like sellotape finding the end is a nightmare... I swear this is why my nails took so long to do, as I kept on losing the end of the tape!

How I achieved my stripey nails...
To be honest I did find it more tricky than I thought it would be... basically I took on too much for my first ever attempt at using the striping tape. But here is how I did it.
1. First paint your nails and let them fully dry. Now I mean fully dry as you may need to reposition your tape and so you don't want the polish to be pulled up by the tape if it isn't totally dry.
2. Next you want to roughly pre-cut all your strips of tape and stick the edges of them on to something that you have close by. If like me you are doing stripes then you will want 4 pieces of tape per nail so you will need to cut 40 pieces in total. Trust me, cutting them all in one go will save you time. My two tips for cutting the pieces would be to give yourself more length than you think you will need and also don't cut the tape at an angle as this will mean you will need to cut the tape twice when it's on the nail.
3. With each nail I started at the tip, using were my nail mets up with my skin as a kind of guideline for my first stripe. I then place down the tape on to my nail with the edge of the tape lining up with the left side of my nail so that I didn't need to cut that side. Then when I was happy with the position of the tape I pressed it down.
4. Next with the edge of a pair of tweezers I just lightly pressed them down on the right hand side of my nail giving me an indentation mark which would be my guideline of were I needed to cut the tape. You could however use a pen just to mark this instead.
5. For the last step I then lifted the tape part way off my nail again and cut the excess off at the indentation I had made. I then of course repeated this for each stripe... which is why my nails took so long to do!
Of course four stripes per nails is not only time consuming but also faffy! So you could maybe do this as just an accent on both ring finger nails or just a single stripe across each nail as a modern take on the french manicure. Or you could even place a single piece of tape vertically down each nail.
Basically you can do so much with striping tape!
Fee xo.

As today was another lovely day here in the UK I thought I would try out a Revlon nail polish that I recently purchased from Cheap Smells!
Revlon Lilac Pastelle is a lovely light lilac cream nail polish that is ideal for spring and even though still available in Boots & Superdrug it can be found on make discount sites for under £3.
I did purchase this from Cheap Smells for only £2.99 however it is now out of stock but can be found on Shop4Makeup for only £1.74 here (delivery £1.49) or from Boots.com for £6.49 here.
But the bottle in some cases is the old style bottle when bought on discount sites.
I did purchase this from Cheap Smells for only £2.99 however it is now out of stock but can be found on Shop4Makeup for only £1.74 here (delivery £1.49) or from Boots.com for £6.49 here.
But the bottle in some cases is the old style bottle when bought on discount sites.

Like many light pastel shades this isn't the easier of polishes to apply as it is slightly watery, though it is fairly opaque with two coats which is what I applied in the images and the second coat does apply a lot nicer than the first.
Also today I wore Sarah Jessica Parker's Lovely perfume as it is such a pretty spring fragrance (£15.95/30ml Eau de Parfum - Cheap Smells here) and got the chance to wear my new stripey shorts from Tesco F&F which were only £6!
Also today I wore Sarah Jessica Parker's Lovely perfume as it is such a pretty spring fragrance (£15.95/30ml Eau de Parfum - Cheap Smells here) and got the chance to wear my new stripey shorts from Tesco F&F which were only £6!
I think I need to hurry up and do my Spring Nail Polish Picks with all this lovely weather.
Fingers crossed it continues like this all week!
Fee xo.

As today has literally been like a summers day I thought I would show you a recent purchase that is an ideal summer nail polish!
Last week in Boots I spotted the new additions to the Models Own Beetle Juice collection - Copper Pot, Tropical Sun and Indian Ocean. I was pretty tempted by Tropical Sun (a vivid shimmery coral/orange) but Indian Ocean just looked so different to anything I had in my collection.
Thinking about it now I should of really applied two coats of this over bare nails to see how it looked instead of using a base shade. But it is just habit to used a coloured base when I buy quite a sheer nail polish. Though I will do a post showing what Indian Ocean looks like on it's own.
You can find Models Own Indian Ocean for £5.00 from Boots, Models Own site (here) or Effortless Nails (here).

Models Own Indian Ocean is a beautiful sheer turquoise blue with gleaming a violet/gold shimmer. This definitely could be worn on it's own however I do prefer an opaque finish so I applied 2 coats of Models Own Jade Stone as a base.
I then applied two light coats of Indian Ocean which applied very easily and also dried pretty quick. So I think without a base it would need 2-4 coats depending on how sheer or opaque you like it.
The finish of this is just so lovely and very much reminiscent of when the sun beams down on perfectly clear ocean water.

It is rare for me to like a sheer nail polish this much but it is just so unique that I can't not love it. Plus I am dying to try this over a coral shade as I'm thinking it will look lovely!
If you love pearly/shimmery nail polish that just dazzle in the sunlight then this is definitely a must for summer!
Fee xo.

Every man and his dog has mentioned this nail polish now. But I really couldn't resist trying it and seeing the beauty of it for myself.
Now this is far from a perfect polish as it is very sheer but for me that is perfect as I love nail polishes that can be used like top coats to add a different finish to nail polishes . So I have applied this over two different shades to show the results that you can achieve with this lovely polish.
If you have been living under a rock and haven't seen or heard of this nail polish before then this is a fairly recent addition to the Max Factor Max Effect Mini nail polish range (£3.99) along with quite a few other shades (I also bought Graffiti an amazing ocean emerald shimmer but more on that in another post). However as Fantasy Fire has been so popular quite a lot of stands just don't have it. Your best bet is to look in Boots as I have been looking in Tesco for the longest time and they definitely hasn't received any new stock of this were as Boots have!

First I decided to try Fantasy Fire over a nude base so I applied two coats of Maybelline Forever Strong Pro in Rose Poudre. I then applied 2 quite thick coats of Max Factor Fantasy Fire.
Over a nude base Fantasy Fire is just lovely. Kind of a cream jelly finish with all the different shades in there coming through when it hits the light. This is probably the most similar to how it looks in the bottle. Just a soft purple-y blue that has them wonderful flecks of red and gold with the odd tinge of green.

For a dark base I applied just one thick coat of Barry M Navy nail polish as it is quite opaque. I then applied three coats of Max Factor Fantasy Fire so that all the amazing colours in the nail polish would show up.
Now this is pretty but definitely more red tones show up in this with a slight tinge of green. I really do love how this can be placed over different bases and gives totally different effects like this. Though for me as I don't tend to go for dark shades I would wear this if I was going out somewhere at night or in winter.

Personally I prefer Fantasy Fire over a lighter coloured base as I think it just looks more unique and eye catching. However over a red shade is equally lovely. Though I have yet to try it over a black base and then apply a matte top coat, which I sure would make it look really different!
Of course some people may be disappointed in how sheer this is if they applied it to naked nails but for me a sheer nail polish like this means endless possibilities. For example when you have got bored of the nail polish you have on you can alwaus just apply a coat or two of this over the top and totally transform the look of the nails!

This really is such a lovely nail polish and as I know how hard this is to pick up I have two nail polishes to give away!
To enter the giveaway simply leave your first name and email address in the Rafflecopter form.
Good Luck
Fee xo.

As some of you may have noticed my blog has been down since Wednesday as I have been having some serious domain issues with my host. However as I was just about to give up all hope as I seriously don't know what I am doing, Maria from Miss Drifted Snow White came to my rescue and fixed my domain settings for me. So lovely of her and I am more than pleased.
So as I thank you please do have a look at her beauty/fashion blog as she really is just lovely!
So as I thank you please do have a look at her beauty/fashion blog as she really is just lovely!
This is probably the cheapest manicure I have featured so far in my 30 Days of Nails challenge as 17 Fast Finish nail polish in Revenge is £2.99 (Boots - here) and I purchased the George glitter nail polish in Starry Eyed in Asda for £1.00 (though I'm sure the George @ Asda polishes are now £1.75)!

I really do like the smaller 17 nail polish bottles from Boots - just the right size as lets face it we hardly ever finish a bottle of nail polish unless we are in love with it. Also I find the shade range always really good... I plan to pick up a few bright shades soon for summer as Boots 17 is 3 for 2 at the moment so 3 polishes for £6 really isn't too bad at all!
17 Revenge is a two coat nail polish with the first coat applying quite watery and streaking but the 2nd coat makes up for it and gives a lovely smooth finish. However I did find the finish wasn't as glossy as I had expected which is why I felt I needed to add a top coat.
I was going to go for a clear top coat but then decided to go for George Starry Eyed as it's such a delicate glitter that just adds something a little bit different to the nails without being too much at all. I really do like it!
For tomorrows nails I am thinking Max Factor Fantasy Fire!
Fee xo.
As I am all about my nails at the moment I thought I would do the nail polish tag that has been floating around recently!
Plus this can count as my NOTD for today as well!

1. What's your favourite nail polish company?
Oh this is a tough question as I go on shades rather than how long it lasts or applies. But the nail polish brand that excites me the most is China Glaze so maybe that is my favourite even though I don't own that many polishes from them. Lower end it has to be Models Own and Revlon.
2. Glitter or no glitter?
If you read my blog on a regular basis you will definitely know the answer to this! I absolutely love glitter nail polish and own quite a lot... I'm thinking around the 20 mark.

3. OPI, China Glaze, or Essie?
Never tried Essie as it's just never appealed to me for some reason. But I love OPI for their mini sets and I love China Glaze for their Christmas gift sets and also I feel they have a lovely range of shades. So it would have to be China Glaze.
4. When do you change your nail polish?
4. When do you change your nail polish?
Well at the moment as I am current doing my '30 days of Nails' challenge I am of course painting my nails daily! But in general I normally paint my nails every other day which is still quite a lot really!
5. What's your favourite colour on your nails?
5. What's your favourite colour on your nails?
I am quite boring really and love nude shades on my nails as they always look polishes and pretty. But I do like my nails looks really different so it also has to be duo chrome or glitter nail polish.
Here are some polishes that I'm loving at the moment...

6. Darks or brights?
Brights all the way! There is nothing better than pulling out all my bright shades (normally oranges and pinks) in summer. Even in winter I hardly wear dark shades as I just don't think they suit my skin tone so I opt for nude or red nails instead.
7. What are you wearing on your nails right this moment?

OPI Let Me Entertain You from the Burlesque collection with Nubar G188 2010 Top Coat.
8. Matt nails in or out?
When matte nail polishes first hit our shelves I really wasn't that interest and didn't think I would like them really. However once I tried a limited edition one from No7 I realised matte nails can looks really good and can be so versatile (matte nails, french glossy tips, nude matte nails, matte nails glossy leopard print) so I definitely think if you love painting your nails you need at least one matt top coat!
9. French Manicure?
A classic french manicure has never really interested me. I'm not really sure why exactly but for some reason even though it makes the nails looks really neat it also looks quite fake and sometimes not elegant at all. Though I do like a play on a french manicure such as spring french nails and neon french tips look great. I don't even like french manicures when people get married even!
10. Favourite summer colours?
Anything super bright! I'm not a huge lover of pastels in summer so I'm more about hot pinks, bright orange, reds and everything that is bright and glittery!
Here are some of my favourite summer shades...

Of course the tag is open to anyone so if you do the tag then let me know in the comment as I love reading them!
Fee xo.

As promised... better nails today!
I thought as it is feeling more and more like Spring I would do some Cherry Blossom inspired nails because they will be in bloom soon enough and they are quite pretty indeed! I really do love blossom trees in spring but for some reason in the UK we don't make a big deal of them... were as in Japan is it a different story all together!
As with most of my nail art this is super easy (though you all tell me if don't seem easy!) and I really do mean it, especially with my secret weapon which I shall reveal below!

I thought as it is feeling more and more like Spring I would do some Cherry Blossom inspired nails because they will be in bloom soon enough and they are quite pretty indeed! I really do love blossom trees in spring but for some reason in the UK we don't make a big deal of them... were as in Japan is it a different story all together!
As with most of my nail art this is super easy (though you all tell me if don't seem easy!) and I really do mean it, especially with my secret weapon which I shall reveal below!
If I was being a bit critical I would say I could of used a lighter blue shade for the base as it is a bit too vivid and maybe also drawn the branches on slightly thinner for a more dainty look.
But over all for my first attempt AND not looking at an image whilst I did it I am fairly pleased! I think these would be ideal for April/May when it is finally spring as they are fun but also quite elegant looking nails. Plus the colour combination goes really well together I think.

Yep, you guessed it! I used a rubbish eyeshadow applicator (that we all hate and throw away) to create the flowers.
So first you need to paint your nails, I chose Models Own Jade Stone but you could use any light blue or a pale pink or nude. Then once that is FULLY dry you can draw on your branches. I used my L'Oreal Super Slim eyeliner but you would use any eyeliner that is really black or a black nail art pen. Again may sure this is fully dry before creating the flowers or else you will lift off what you have already done.
Next it is time to create the little flowers. With your nail polish brush with not too much nail polish on (I used Natural Collection Hibiscus) lightly dab a small amount on the eyeshadow applicator. Then you just have to dab small random splodges on to each nail - if you do find you apply too much to one nail you can turn over the applicator and dab a bit to soak up a bit of the excess and make the splodge more flower like.
To give a bit of dimension to the flowers I repeated the process but with less nail polish with Revlon Nude Chic. I didn't clean the applicator just added a bit of nude polish and it was fine. Then before it was dry I added a clear top coat.
See, I told you it was that easy!
You can view all the other nails in my 30 Days of Nails Challenge - here.
Fee xo.

Arghhhh, no. Failed my nail challenge!! Well kind of! But at least I am posting yesterday's nails and not just skipping them.. though I wish I could as I really don't like these nails.
Yesterday was a bit of a rubbish day, I'd had no sleep and was feeling just blurgh... so I was lacking all inspiration. But them I decided I wanted to do pretty gradient nails but then realised I had no sponges (normally I use the foam No7 makeup sponges cut up) so I tried kitchen towel and it just didn't work. But at least I tried!

However I do like the idea and the shades in this manicure, so when I do get some sponges I think I am going to re-attempt this and I'm sure the gradient will look a lot smoother which will look pretty!
As for the shades I used I didn't in fact use Barry M Mint Green but Models Own Jade Stone... this is actually how tired I was yesterday! Also as you can see I used Collection 2000 Hot Looks Dynasty (a really good range if you are looking for budget nail polishes) and a glitter KIKO nail polish that I have forgotten the number of!
Going to try and do something a lot more fun and nail art-y for tomorrow/today's nails (it's currently 3am as I write this)! But we shall see!
Fee xo.

Firstly thank you to all that commented on my Stop! Grammar Time post. I really do appreciate all your kind words and it has made me feel really supported which is a nice feeling as I had been feeling frustrated by the whole thing for some time!
Anyway, on to today's nails!
I thought I would do something to celebrate St. Patricks Day and even had the idea of using the green glitter to create little shamrocks but it was just too time consuming and so I gave up?! I also think I may have gone for the wrong shade of green as Barry M Mint Green isn't very green really! Even though it is green, hmmm!

As for the glitter this is a JRB glitter nail polish in shade 172. Sadly I can't find this anymore but if you search for 'JRB Nail Polish' on eBay there are so many different glitter nail polishes for around £2.50 including p&p. I think my favourite shade has to be the JRB Cerise Mix Glitter (here) which I would buy if I hadn't of just purchased some amazing Meteorites polishes (also on eBay). I really am obsessed with glitter nail polish aren't I?!
If you are a fan of glitter nails and want a bargain definitely search for - Saffron, JRB or Meteorites glitter nail polishes on eBay!

I kind of wish now I had spent the time creating little 3 leaf clovers with the glitter nail polish (with the help of a tooth pick ofcourse) but I know it would of taken me forever and a day. Much like the time when I decided to find a four leaf clover in Ireland. I did it... but it took forever!!
Hope you are all having a lovely weekend and have a lovely Mother's Day tomorrow!
Fee xo.

After 15 days of painting my nails I woke up today out of ideas and lacking inspiration. But as I was applying my makeup and using the new-ish L'Oreal Super Slim eyeliner I had a bit of a light bulb moment of using the liner for a bit of nail art as the nib is quite precise.
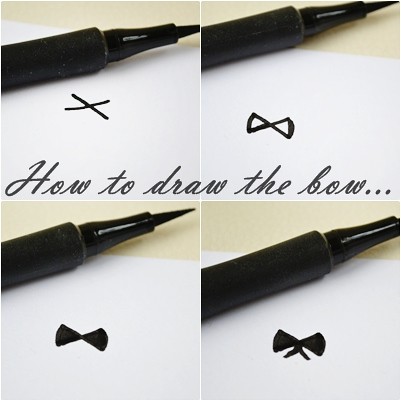
I decided to go for bows and polka dots for ease and trust me this is easy! The bows can be done with either a nail art pen or an eyeliner pen (easier to use) and the dots can be achieved with the end of a bobby pin/hair grip and some black nail polish or a dotting tool/nail art pen.
But if you still don't believe me about the bows then scroll down to see how to draw the bows in 4 easy steps.
But if you still don't believe me about the bows then scroll down to see how to draw the bows in 4 easy steps.

For the base nail polish I applied two coats of Models Own Champagne (£5.00 - ASOS) which I hadn't used in so long (Topshop & Max Factor do similar shades). Next it's on to the bows which as you can see below are pretty easy to draw on. After drawing on all five bows and the liner hadn't fully dried (you have to be quick though) I placed on the little Nail diamonds which are from Stargazer (£2.50 - Stargazer site). If you are too slow you could apply a clear top coat once you had finished your nails and place the diamonds on then as of course the top coat makes them stick properly. But of course this is optional and can be totally skipped!
I then added the polka dot with the Models Own/Wah Nail Art Pen which I rate and I don't rate at the same time - the tip/dotting tool is great and does the job (this is what I used for the dots) but the brush inside to achieve lines and different shapes etc is just SO rubbish. I think I have had around 4 of these pens now and all the brushes have fallen out. After the dots it is important to leave them to full dry and then you can apply a clear top coat as you do not want the bows to wash off!
They really are that easy! But it you do feel like you struggle with anything nail art related then it is worth practising drawing the bows and getting the dots the right size on a sheet of paper before you start. It is surprising how much it helps actually!

On a bit of a side note but still very much nail art related, the founder of WAH nails - Sharmadean Reid has wrote her very own nail art book - The WAH Nails Book of Nail Art: Fashion at your Fingertips which includes 25 nail art tutorials! The book is out 1st April 2012 for only £6.79 on Amazon (here - also you can look inside the book) so I have pre-ordered the book for a little giveaway to mark the end of my nail challenge at the end of the month!
I am officially half way through my 30 Day of Nails challenge now and I really do feel like I need to thank you all for the wonderful comments and tweets I have received. It has been so so lovely and I am so pleased people are enjoying it!
So thank you!
Fee xo.

Back to glitter nails today! My lovely Beauty Bay order arrived with the fabulous Nubar 2010 Glitter top coat and I had to try it out to see how it looked.
Now this definitely is love. I have so many glitter nail polishes but nothing like this at all in my collection and for £5.50 I think the polishes is definitely worth it and I am so glad I decided to finally get it.
Of course I am so impressed with how this looks when it catches the light.. just so beautiful. But what really impressed me was how densely packed this is as I literally just have one coat of the polish on my nails here applied over Orly Black Out and it also applied so evenly - you can really see the quality. Plus also how smooth the finish is... not at all like a glitter nail polish.
Now this definitely is love. I have so many glitter nail polishes but nothing like this at all in my collection and for £5.50 I think the polishes is definitely worth it and I am so glad I decided to finally get it.
Of course I am so impressed with how this looks when it catches the light.. just so beautiful. But what really impressed me was how densely packed this is as I literally just have one coat of the polish on my nails here applied over Orly Black Out and it also applied so evenly - you can really see the quality. Plus also how smooth the finish is... not at all like a glitter nail polish.

When I placed my order for the nail polish I had in my head that I needed to try this with a matte top coat as I was sure it would make the holographic flakes look amazing and I think I was right. Just look at how unusual this looks, it just reminds me of when you get that amazing glow from an oval. Just perfect.
I am now dying to try this over other shades and I also want to see what this looks like built up more with a few coats so it's more opaque (if it is possible). I'm also thinking the polish would look great just on the tips of the nails like a french manicure over black polish and made matte.

I guess that is what I love about top coats... they are just so versatile and you can actually do so many different things with them. Up until now I had never tried Nubar but this has definitely got me wanting to google more nail polishes by them to see different swatches as this is just amazing quality and is so unique looking.
For me £5.50 definitely well spent as I know I am going to get a lot of use out of this polish!
Fee xo.

As promised here are my Yves Saint Laurent Resort 2012 inspired nails! Sadly I couldn't get the shades spot on and I did the print a little too big... but oh well! I still really like how they look.
Now these literally were so easy to do! Grey nail polish base - George at Asda in Raincloud. Then splodges of yellow (Barry M 134) and red (Barry M 262). Leave to dry. Then either black nail polish with a bobby pin/hair pin or dotting tool for the dots. I just used a nail art pen as it was quicker. Then optional would be the little lines which you can only really see if you zoom in on the print. To do this I used the needle stopper of my nail art pen but you would actually use a sewing pin dipped into black nail polish!

The just before it was fully set I apply a clear top coat. I didn't leave my nails too full dry before I applied it as is kind of dragged the black dots in the centre of the flowers and just made it more similar to the actual print.
I am actually thinking though it would of maybe looked more similar to the print it they were matte nails as of course the dress isn't glossy!

As I mentioned in my last nail post I really do love trying out different prints that are on trend... I mean you can even look at high-street prints. I'm really quite inspired by some prints from H&M and also ASOS at the moment.
So really pretty and different nails but very easy to achieve.
See you tomorrow!
Fee xo.

I learnt two things today: 1. If you are painting your nails every single day make sure you have enough nail polish remover (I had to do the applying nail polish over old nail polish to remove it!). 2. NEVER attempt to take pictures when it is going dark... these literally were taken at 6pm without any lights on as I didn't want any shadows.
Of course my nails in the above image do look okay but these are so much nicer in real life as the base shade I used OPI Classic from the Designer Series is just so shimmery like diamonds, which just didn't show up due to me taking the images so late in the day! But oh well.

Though I think for the first time in my 30 days of nails challenge I have actually got the combination slightly wrong as OPI Classic actually looks amazing on it's own (see here) and Saffron Gold Glitter Speckled nail polish looks amazing over either just a nude or black shade. So I think this is actually too much!
But I am glad I posted about these nails as I actually found a UK eBay seller that stocks the Saffron Gold Glitter nail polishes for only £1.75 with free p&p - here. Bargain!

As for tomorrow's nails whilst I wait to receive my amazing Nubar 2010 Glitter Top Coat I have decided to try out some designer inspired nail art as I love prints and love how you can translate them so easily in to nail art. So I had a look and found this lovely print from this years Yves Saint Laurent Resort show and I am thinking it will look lovely on the nails, also pretty easy to do as well!
As for your requests I am also going to be trying out more gradient glitter nails and also Galaxy nails if they turn out okay as I have only ever attempted them once!
You can view all 13 nails so far in my 30 Days of Nails challenge here!
Fee xo.

Crazy nails today! No logic or thinking behind these nails at all... I just spotted Models Own Pink Punch and a nail art pen and decided I would have bright spotty nails.
After painting my nails though I did remember that Models Own were supposed to be in my bad books (they stole a nail image off Makeup Savvy and passed it on to another company who published it in a newsletter) but I'm always bad at staying mad at anyone/anything for long. Though I am still quite annoyed by the situation but oh well, I won't be cutting on my fingers to spite my nails!

Even though Pink Punch (£5.00 Models Own or ASOS) is an amazingly bright pink shade it one that is very hard to capture as in some lights it looks neon pink, in some it looks bright coral and sometimes it just looks bright pink. So you will just have to try to imagine this slightly more pink toned that it appears in these images!
Application for Pink Punch is good but I do find it slightly watery so if you aren't careful it will flood the nail bed but other than that it applies smoothly and is opaque in 2-3 coats. I just applied two coats here as I knew I would be putting dots over the top.
As for the dots I used a Stargazer nail pen (can be found on their site or on eBay) and started off with a single dot in the centre and then carried on in a swirl outwards as I find I don't over do the dots on some nails that way. If you don't own a nail art pen using some black nail polish and a match or the end of a hair pin will also work fine.
If there is any nail art you would like to see whilst I am doing my 30 days of nails challenge or anything for that matter, just leave me a comment below and I will try my best to do it.
Fee xo.

The Maybelline Forever Strong Pro range do and excellent collection of nude shades which I really love - actually they are my favourite nude polishes. So I thought I had to show off my favourite shade whilst doing the30 days of nails challenge.
As to can see this is such a lovely dusky rose nude that goes with pale skin so well. When I wear this I almost feel like I have had a manicure as my nails look so perfect.
Rose Poudré is priced at £4.09 for the 10ml bottle as are all polishes in the range which can be found in Boots, Tesco, Superdrug etc, OR at the moment they are £3.09 on the Boots website - here. I am actually thinking of purchasing a few brighter shades from the range and getting them sent to store for free as I can't stand paying for p&p when so many sites offer free delivery.
Rose Poudré is priced at £4.09 for the 10ml bottle as are all polishes in the range which can be found in Boots, Tesco, Superdrug etc, OR at the moment they are £3.09 on the Boots website - here. I am actually thinking of purchasing a few brighter shades from the range and getting them sent to store for free as I can't stand paying for p&p when so many sites offer free delivery.

There are around four/five nude shades in the Forever Pro collection which is pretty good for the high street and I kind of feel that everyone would be able to find their perfect nude shades whether you have pale or dark skin which is really good.
As for the application nothing can be faulted, the brush is perfect, the formula is smooth and it applies so well. My nails here are with 2 coats of the polish and as you can see the they are opaque and it doesn't look like there is a thick layer of polish on my nails - something I think is important when going for nude nails as a heavy thick layer just removes that chic manicure look.
The next shades I want to try are definitely Hot Salsa which will be perfect for summer and Chic Gold.
Fee xo.

Day Ten of my 30 days of nails challenge and I decided no more glitter and went for a classic shade!
Now I do love Revlon nail polishes especially when I find them really cheap on eBay or Fragrance Direct and it may look like I really love the All Fired Up shade (which I do) with how little is left in the bottle... however I may of just used this to paint the windows and doors of my nieces dolls house as it was just a perfect shade of red for the job!

But sadly it was slightly harder to use now due to there only being a small amount left in the bottle and the brush only just touching the polish inside. So I was finding I had to re-dip my brush in quite a few times per nail which made the application not as perfect as I would of liked. But that is my own fault for using the nail polish as a miniature pot of paint I guess!
You can find Revlon All Fired Up at Boots for £6.49 or on the Boots website - here.
This really is a nice glossy red that feels quite pin-up like and a little sexy so definitely one for nights out or when you want to feel a bit glam!
Fee xo.

The things you do as a blogger! I have just spent the last 30 minutes uploading and editing these images with one hand as the other hand holds my charger in as it decided to break on me this morning! Actually this whole post is being wrote by one hand... ffs!
Anyways so today nails... I'm currently on day nine of my '30 days of nails' challenge and my nails aren't hating me just yet even though I have been obsessed with glitters recently! Today I decided to use my lovely KIKO french manicure (209). However as the polish is pretty sheer I could see my nail line, which I don't like, so I quickly grabbed a glitter and literally threw it over the tips of the nails (and kind of waved my hand about after to let the glitter fall down on to the nail) before they had fully dried!

Thankfully I managed to get one good pictures of how delicate this looks on the nails (the first pic) as I was just in love with how pretty it looked as apposed to glitter nail polish! Just not as raised or thick on the nails, which I really do like!
I am thinking I need to get myself down to Hobby Craft/Card Craft (I would provide a link but it's just to hard to do with one hand) to pick up some more glitter as it was so quick.. though I must admit glitter was everywhere after I had finished. The Glitter is from a brand called Jones Tones and I am pretty sure they are all around the £2.00 mark, though I did find the glitter I used here for 99p on clearance!

I then finished off with a clear top coat just to seal in the glitter and that was it. For something so pretty it really did take me under 5 minutes and was so easy to do! I have mention the 17 top coat before I am sure, but this just never let me down and is that perfect formula of not being too thick so it can drag or being too watery either.
Just super quick nails that are delicate and pretty.
Really if you think you are rubbish at nails/nail art try these!
Fee xo.
Subscribe to:
Posts (Atom)