

Today I thought I'd talk photography, specifically blog photography! This is a true passion of mine and with photography playing a huge part in blogging these days I thought a few tips would be helpful to fellow bloggers.
Whether you own a compact digital camera, a bridge camera or DSLR most of these tips can be applied/tried out!
Natural Light, Steady Hand
When it comes to lighting for still-life/product photography natural light is without a doubt the best... unless you have thousands to spend of studio lighting that is. To this day I've yet to use the built-in flash on my camera or any artifical lighting to light my photos as it does basically look articifal and harsh. So natural lighting for me wins hands down. Now I know most of you will be thinking "But Fee, there's no light in winter!" and I so hear you, I struggle with that too on a daily basis! However I have 3 tips for this, besides from shooting at the brightest time of the day (between 12-1pm in winter) and keeping all lights turned OFF.
1. Position your set-up facing and near a window - This means your subject will get the maximum light possible and it will be as even as possible. Also this means you will have your back to the light source, avoiding any glare or being blinded... though this is highly unlikely in winter.
2. Hitch up the ISO (your sensitivity to light setting) - Most cameras have this setting, even digital cameras, and it's easy to keep it on auto. But on dull days setting it a little higher and overriding the auto settings can do the world of good. Anywhere from 200-600 won't compromise the photo quality and can really brighten overall images. However a steady hand or tripod may be needed, which nicely leads on to my last tip.
3. A steady camera is a must - This is a total must for sharp images that are blur-free. However a higher ISO, dull natural light or a case of the shakes can really prevent this. My main tips if you use your camera handheld is to securely grip your camera near where you press the shutter release button and use your other hand to rest the camera on, keeping it steady. Then keep your elbows into your body or rested firmly onto a solid surface. If you still suffer from your camera shaking then opting for a tripod may be the best thing. All tripods pivot and move quite freely so really won't restrict how you take photos unless you like to take them overhead.
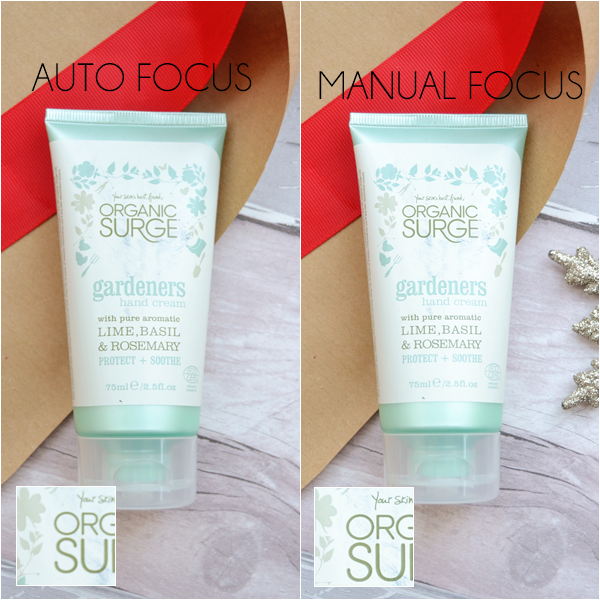
Up Close Shots - Manual Focus
Now if you're a stickler for sharp images or want to ensure your image is totally in-focus for cropping/zooming purposes when editing then this may just be a handy tip. As you can see in the two images above, the right image is just that bit more clearer and sharper (this can be most noticed in the writing detail and the texture of the ribbon). This is achieved by switching to the "MF" setting on the camera lens and manually focusing the lens. To do this you simply turn the focus ring of the lens (if you have a zoom lens you will have two rings and it will be the ring towards the end of the lens) until your subject is fully in focus. This is also useful for times when your camera just won't focus on auto-focus due to an overcrowded setting or when the light heavily reflects off shiny surfaces or products and the camera insists on focusing on that rather than the entire product.
Another great use of manual focus is to ensure even the most zoomed in part of your subject is totally in focus. This is great when cropping specific sections on an image in the editing process or zooming in when editing to create ultra up-close images (thinking lip swatches, up-close product images, nail swatches).
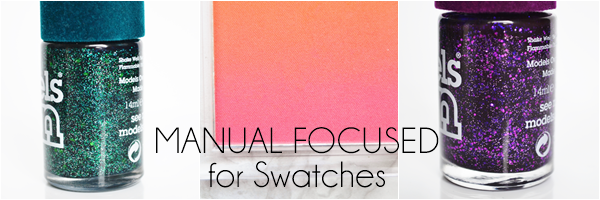
To do this you simply manual focus as normal with the screen as your viewfinder in live view mode (basically so can see exactly what you are shooting), press the magnifier button to zoom in, fine tune the focus, press the magnifier button again to zoom out before taking the shot. Above are three shots I've used this technique in, as you can see they aren't styled or pretty in any way as my intension was to crop them in editing, which you can see below!
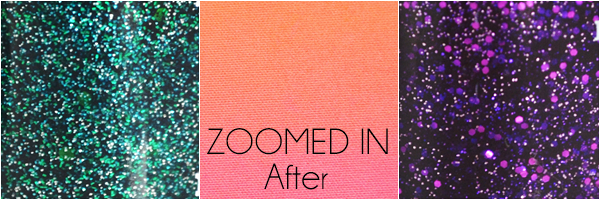
Yes, you could take the shot as normal and then crop it when editing the image but 9 times out of 10 the detail won't be focused enough for your liking. This method basically focuses detail that the naked eye just can't see well enough!
Light from all angles
Back to lighting now and a subject that is often overlooked. In my first point I mentioned how your set-up should be facing your light source to achieve the most even light. However there will be times when parts of your subject/set-up are darker or are casting shadows. To eliminate this a number of tools can be used - mirrors, white foam boards, silver reflectors (can be homemade - see DIY posts here). All of these can act as reflectors of the light entering through the window and bounce the light back onto your subject. These can be positioned just on one side or on both sides of your set-up - playing around with them is the best thing here!
Another option for even light is to place a board/background onto a windowsill and photograph at a birds eye view angle. This is something I often do!
Style the Shot
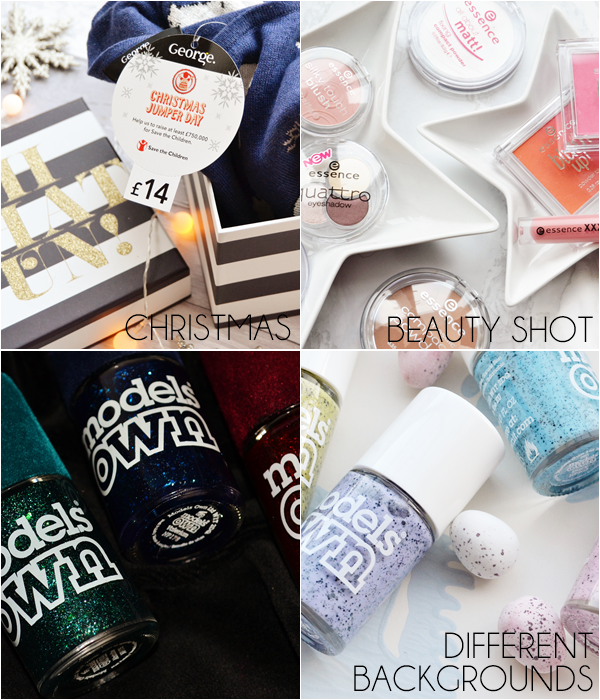
This is possibly the thing that could make the most difference if you aren't doing it already. Styling the shot, especially in still-life photography, is essentially what makes the image. You could of course opt for a plain white background but switching it up is much more fun and will make your blog photos instantly more eye-catching! Above I have a few different examples all on different background and laid out in different ways.
For images with a large amount of products (generally hauls and monthly favourites posts) I opt to shoot from above and zoomed out to make sure I include everything in the shot, or I will bundle everything in a gift box and angle all the products so the labels are visible. For specific beauty topics I'd suggest trying to set the scene with props... talking about what's in your shower: place a towel next to your products and maybe even splash them with water, writing about your 5-minute face on last-minute mornings: place the products falling out of a makeup bag on your desk next to a cup of coffee. It really is as simple as that! As for backgrounds, wallpaper samples pasted onto a large white piece of card is such a cheap option and one you can have a few of/switch up when you get bored or with a change of season. But for more durable background, contact paper (adhesive and wipe clean) on a wooden board will last you forever and look great!
If you are still stuck for ideas it's worth taking inspiration from product photography in magazines and catalogues.
Edit!
Last but not least the very step that should be last thing you do before uploading your photos to your blog. Because even the best photos require editing... actually it's probably what makes them the best! All my photos are edited with the brightness increases, sharpened and the colour temperature altered. Brightness and sharpening speak for themselves but colour temperature when increased can change a blue/cool toned looking image into a normal warmer looking image and an orange or yellow looking image can be toned down by decreasing the colour temperature - this can be a very handy tool! As for free photo editing programs I personally love to use Photoscape (download from CNET here), though the editing part of the Windows Photo Gallery will suffice if you are new to blogging.
This has been a little more detailed than I had planned! But I very much hope these tips will be of help if you are wanting to improve your blog photography skills!
Fee xo.
This has been a little more detailed than I had planned! But I very much hope these tips will be of help if you are wanting to improve your blog photography skills!
Fee xo.